
Gardening with Kids: June 2018 edition
We have officially made it one year into cultivating our own home garden, so I am finally getting on the ball with sharing more about our journey up to this point.
Many of you have asked for details about our experiences gardening with kids in our backyard garden, so I will be sharing monthly updates here in hopes to further inspire other families to help their children to learn to like fresh foods from the ground up!
Be it a vertical garden indoors, a small backyard garden on the patio, or simply planting a single seed in a disposable cup on the kitchen counter, I hope that sharing our very amateur-level entry into at-home gardening with kids will remind anyone on the fence about it that you too can garden. You just have to start somewhere!
Below is a recap of our journey thus far, as well as other information I will be sharing each month to give further inspiration for how to include veggies in your family's daily life!
Backyard Garden Progress June 2018
This is far from a complete recap, but below are some of the progress highlights from the past year with our backyard garden.

April 2017
- My husband created built-in garden beds in our back yard for my 30th birthday gift [DIY tutorial for the ones he made coming soon! Subscribe here to find out when it is available.]
- Planted our first set of Spring seeds and starter plants. Crops included: zucchini, cucumbers, tomatoes, carrots, bell peppers, green bean varietals, jalapeno peppers, strawberries, and carrots
- Total seasonal yield: 18 large and 106 cherry tomatoes, 12 cucumbers, one teeny carrot, two strawberries, one radish, eleven okra, 32 green beans, 2 jalapenos, 29 extra long green beans, and 16 sugar snap peas.
- Items we would/would probably opt to do next year: the extra long green bean variety we grew we didn't know how to cook and thus didn't eat/enjoy to its fullest potential. We need to learn to like okra more, or else plant less as it was not our favorite crop. The squash and zucchini never took, so we will try those again with healthier starter plants hopefully. Our bell peppers also never produced, so we will need to figure out why and try again in upcoming years. We need to figure out how to help the carrots and radishes thrive better as well, as each produced a nominal crop.
October 2017
- Rotated the crops between each bed per plot rotation recommendations I had read [Gardening rotation guide with what we have done coming soon! Subscribe here to find out when it is available.]
- Planted our first set of Fall seeds and starter plants. Crops included: kale, romaine, red leaf lettuce, rainbow chard, Brussels sprouts, cauliflower, broccoli, and sweet potatoes.
- Total seasonal yield: endless kale (three varieties), romaine, and red leaf lettuce, four batches of rainbow chard, 11 Brussels sprouts, one small head of purple cauliflower, and three heads broccoli.
- Items we would/would probably opt to do next year: we loved having so many different greens and how we didn't have to buy lettuce, kale, or salad greens for several months. The Brussels Sprouts looked promising all season and yet produced very few viable sprouts to snap off and actually consume. We will need to learn how to improve each stalks yield in coming years. The cauliflower rotted quickly, so we will need to either eat when it is still small or figure out how to keep it thriving to a larger size next year. Lesson learned on the broccoli is how it can continue to produce florets even after the main broccoli head has been removed (to eat). We likely could have gotten more yield from this had we known.


April 2018
- Rotated the crops between each bed per plot rotation recommendations I had read [Gardening rotation guide with what we have done coming soon! Subscribe here to find out when it is available.]
- Planted our second Spring's worth of seeds and starter plants. Crops include: zucchini, yellow squash, cucumbers, tomatoes, carrots, celery, bell peppers, jalapeno peppers, carrots, three green bean varietals.
- We invested around $75 total for all of the seeds and starter plants we needed to start a new season. No new soil was needed from the past year, as we had added homemade compost prior to planting/preparing the garden for Spring.
More Updates and Resources to Come!
As part of an upcoming collaboration and project, I will be sharing how-to guides for backyard gardening with kids. To stay up to date on when updates and resources are available, subscribe here!
Veggie of the Month: Radish
I am honored to be a monthly contributor to Veggie Buds Club. Intended for children ages 3-6, Veggie Buds Club offers activities that empower kids to Learn + Cook + Play + Create + Grow with a monthly vegetable. Through fun, pressure-free ideas, Veggie Buds Club helps expose your child to a variety of vegetables in age-appropriate and engaging ways.
If you are interested in checking out Veggie Buds Club for your family (or to gift a friend!), I encourage you to hop on over today! Monthly registration closes at midnight on the first of the month, so be sure to sign up so you get this month's box - complete with a tip sheet featuring the advice I share below!
Tips shared in this month’s Veggie Buds Club:
Did you know one of the best steps you can take to getting your kids to TASTE a new food is breaking through the barrier to getting them to TOUCH it?
That's why Spring becomes a particularly fun time to help kids learn to like new produce, including radishes. Here are some ideas to breakthrough the barrier of neophobia (or fear towards new foods) in ways that emphasize kids to TOUCH before we as parents expect they will TASTE:
1. Plant your own radish.
Use your growing kit from this month's Veggie Buds Club, or go to a local gardening store for some seeds and soil. Even if you don't have an at home garden, you can plant radishes in their own small pot for each child. The exposure to the vegetable before it is even grown or in edible form can make for effective nutrition education away from the table!
2. Let your child clean the radish.
Whether you grow your own radish, pick some up at the farmer's market, or grab some at the grocery store, ask your children to be in charge of washing them. As a vegetable that grows underground, you can use this as an excuse to get your kids hands on with washing the dirt away. This helps kids to become comfortable with touching it when there is no expectation that they should too eat it.
3. Consider a visual assessment.
Away from a meal time, consider cutting up a few different radish varieties as part of an experiment. Ask your child(ren) to pick up each variety and then either draw pictures or explain the similarities and differences of each (colors, shapes, smells, touch, etc.). Once they have handled and engaged with each, ask your child(ren) questions that probe interest and potentially a desire to take a bite of each to further compare and contrast differences, like: "Which type of radish do you think is the prettiest? Which one do you think tastes the best? Do you think they all taste the same?"
Having this kind of hands on, pressure-free exposure away from offering new foods (like radish) at meal times can be a great way to get kids learning to like new vegetables before they've ever had it on their plate!
Remember to check out Veggie Buds Club before 12/midnight on the first of every month if you aren't already a subscriber. Then you can still order this month's box and veggie in time to participate!
Other Areas of Growth in the Garden
Garden Yields Update
Total seasonal yield to date (June 1st): 6 yellow squash, 3 zucchini, 1 small cucumber, 11 cherry tomatoes, 17 broad beans


New Feeding Wins or Progress via Food Play
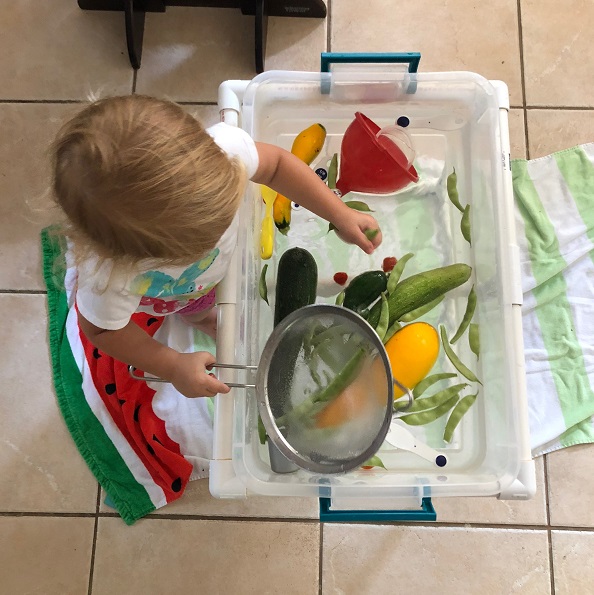
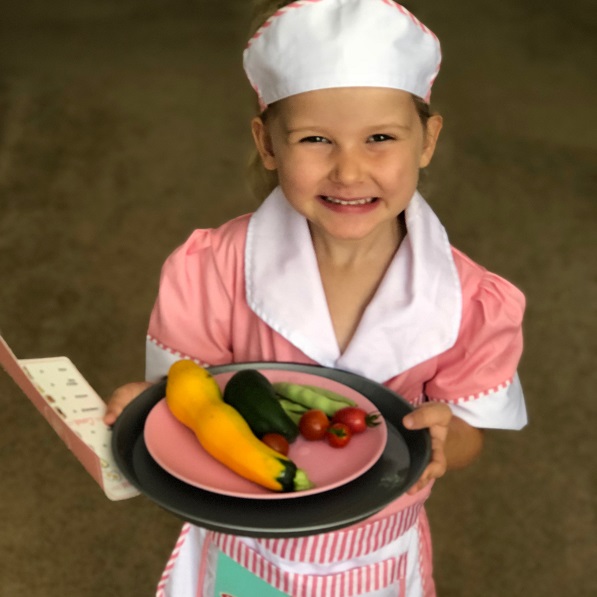
The girls continue to enjoy picking the tomatoes best. Each girl will put the tomato in her mouth but seems apprehensive towards biting down and how it "bursts" in their mouths. The most fun the girls have had this past month was in pretend play having a "restaurant" with all of the produce we picked that day. They washed it (in this DIY water table), then prepared pretend "recipes" from the ingredients. They dressed up and served these meals as a chef and waitress for hours of creative play. While it didn't lead them to eating any of the produce then and there, it got them comfortable and familiar with it before we as a family used the ingredients in actual meals!
Want More Actionable Ideas on How to Turn Your Veggie Averse Kid Into A Gardener?
Subscribe here for updates and early bird access anytime there is a new resource added and available!